License
By using or installing any product bundled with this license, you agree to this license agreement. If you do not want to agree to this license or if you don't understand it, you should stop using and/or uninstall this software at once.
Personal use
You may use this software for personal home use free of charge. To support the project
you can choose to buy a license for personal use.
Commercial use
A license must be obtained to use this software for commercial use. The license
can be obtained from the Advanced Renamer website and will cover life time
use for one person. It is allowed to try out the software for a limited time
before a license is required.
Any organization that is considered to be a business, government entity, or
non-profit organization, is considered commercial in regards to this license
agreement.
For automation purposes on multiple servers one license has to be obtained for
each individual server.
Click here to purchase a commercial license.
Restrictions
You may NOT...
... use this software if you do not agree to this license agreement.
... remove this license from the software
... remove any other files from the software
... repackage the software in a different installer.
... modify, decompile, or disassemble the software.
... use this product for illegal use.
... sell this product without prior written permission with the purpose of gaining profit. It is allowed to sell this product if the fee is only used for administration, shipping or other expenses directly related to selling the software. It is also allowed to sell this product if it is a part of a larger compilation of different software.
Exceptions to this license
A per-user license agreement can be made to give certain users special rights. The author of the product decides how this is done and who will get it.
Warranty
You use this software at your own risk. The developers of this product take no responsibility for any damage of any kind. The author of the software can change this license agreement at any time without prior notice.
Privacy
Privacy terms can be found at https://www.advancedrenamer.com/user_guide/privacy. By agreeing to these license terms, you also agree to the privacy terms.
Orders
Order process is conducted by the online reseller Paddle.com. Paddle.com is the Merchant of Record for all orders. Paddle provides all customer service inquiries and handles returns.
Privacy
This document describes how user data is collected and used. The goal is to give easy to read information about how data is used and how to either opt-in or opt-out.
Website
To post messages in the forum a user must create a user account. To create an account a user must enter a valid name and email address. All values entered during user account creation, except for email address and password, will be publicly available. To be deleted from this user register, write to the email address listed under Support.
Any values supplied for user account creation, will not be used for marketing purposes and will not be made available to any third party.
Advanced Renamer software
Data will be sent to the Advanced Renamer online services during the use of the following features:
- Software updates check: Will send information about software version, license key, and operating system including version number.
- License activation: Will send information about software version, license key, and operating system including version number.
- Geo related functionality: Will send GPS coordinates to the online services. Geo data can be used for tagging JPEG images with city or country.
- TV Show import: Will retrieve TV show information from third party database for the search term used. (Only applies to versions before 3.89)
To opt-out of specific data sharing functionality, please disable or stop using the functionality in the software.
None of these data will be shared with any third party or used for marketing purposes.
Any of the above data may be stored and later used for statistical and anti-piracy purposes.
Purchase
The reseller Paddle.com will handle data collection during purchase. They may collect name, email, and payment data during checkout. The data is collected for the purpose of purchase, payment, and license key delivery and recovery. Name, email, and license key will be shared between Advanced Renamer online services and Paddle.com.
Data supplied during checkout will not be used for marketing purposes.
Change of privacy terms
These privacy terms can be changed without notice when new versions of the software are released.
This document was updated 2024-01-17.
Getting started

Here are some easy steps on how to get started renaming files in Advanced Renamer.
Step 1: Add files
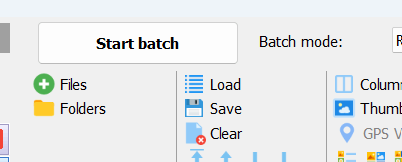
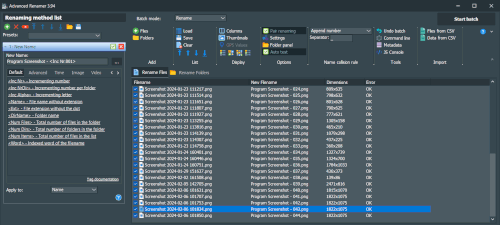
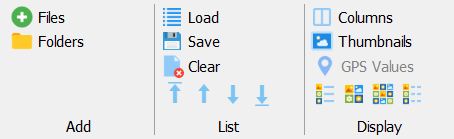
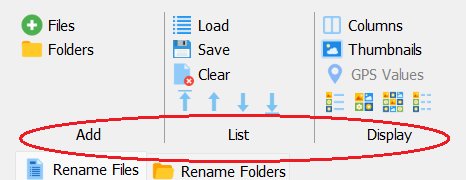
The first thing you want to do is to add the files you want to rename. You can do so by clicking the Add button
highlighted in the screenshot, or you can drag and drop files from Windows Explorer to Advanced Renamer.
If you add a folder, all the files contained in the folder will be added to the list.
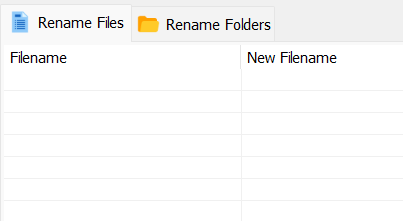
Note, you can also rename folders with Advanced Renamer. To do so, click the "Rename Folders" tab above the item list.
Step 2: Add methods
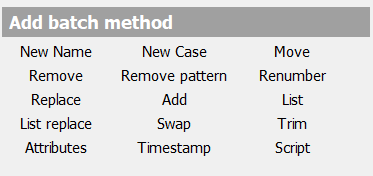
The methods are used to define the rules used for the batch rename. You can add methods by clicking the Add button in the left part of the window.
There are various methods depending on the way you want to rename your files. You can read more about the different methods in the Methods section.
You can also add methods by clicking the method name in the toolbar in the bottom of the method panel.
Step 3: Verify new names
When the files are added and the methods have been setup, you can verify the new names in the column called "New Filename".
It is good practice to always check the result of the batch, before actually renaming the files. If you are not satisfied by the displayed result,
you can update the configuration of the methods to give you the desired result. The column og new names will update automatically.
Step 4: Start batch
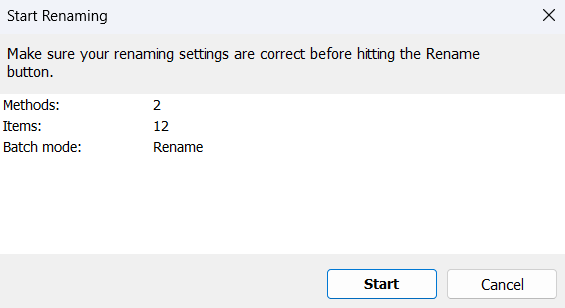
When ready, you can perform the batch rename by clicking the Start Batch button in the top of the window.
A new window will appear where you can click the Start button to start the batch.
You can also use the F9 keyboard shortcut to start the batch.
If there are mistakes you didn't catch before starting the batch, you can revert the whole batch by using the Undo Window.
What else can it do?
Advanced Renamer can do a lot more than just renaming files. You can also move and copy files and folders. Batch modes.
You can use tags to add metadata to the file names. Tags.
For more advanced uses, you can use regular expressions and scripting in your batch configuration. Regular expresions - Script Method.
Examples
The software can be very advanced and some tasks might be difficult to figure out how to do. Below you will find common examples that might help you out.
Pictures
Downloaded files
Scripting
Downloaded files
Case: I have downloaded a bunch of files from the internet, but all the spaces are _ and all the files ends with an unwanted suffix. The file name could be something like the_x_tv_show_cooltvstation.avi.
We need to use three methods to do the following:
- Remove cooltvstation from the files.
- Replace underscores with spaces.
- Make the first letter in every word upper case.
Do the following:
- Add the files to the list.
- If there are methods in the method list click the Clear Methods toolbar button.
- Click Add Method.
- Select Replace Method and click OK.
- In the text box Text To Be Replaced type _cooltvstation
- Make sure the text box Replace With is empty.
- The new file names should now look something like this: the_x_tv_show.avi
- Click Add Method again.
- Select Replace Method and click OK.
- In the text box Text To Be Replaced type_
- In the text box Replace With type a space.
- The new file names should now look something like this: the x tv show.avi
- Click Add Method once again.
- Select New Case Method and click OK.
- Check the radio button Set Upper Case First Letter In Every Word.
- Set Apply To to Name.
- The new file names should now look something like this: The X Tv Show.avi
- Verify the names in the list.
- Click Start Batch.
What we did here was to use more than one method at the same time to produce the desired result. When using more than one method you should make sure they are applied in the correct order. You can move the methods up and down to change the order in which they are run.
Pictures
Case: I have taken a bunch of pictures with my digital camera and want to change the file names from something like DSCF3028.jpg or something more useful with the date and time the picture was taken in the file name of the picture.
Most digital cameras store information about the picture directly in the picture file when it is taken. Advanced Renamer can use this information to give the file a name with the date and time the picture was taken.
Do the following:
- Add the files to the list.
- If there is methods in the list click the Clear Methods toolbar button.
- Click Add Method.
- Select New Name method and click OK.
- In the text box type: <IMG Year>-<IMG Month>-<IMG Day>_<IMG Hour>-<IMG Min>-<IMG Sec>.<Ext>
- Verify the names in the list and click Start Batch.
Tips: If you have taken more than one picture within a second this will not work because more than one file will get the same name. To make it work you need to change the Name Collision Rule to Append Incrementing Number or Append Img Subsec.
Scripting
I often get various questions at the forum for how to use the program and how to configure it for various tasks. Sometimes the particular task is so complex and so specialized that the batch methods supplied with Advanced Renamer cannot help the user. This is why I added JavaScript support to the program and in the next paragraphs I will show you how it works.
 I will base my example on a simple task. Imagine we have a lot of files where we want all odd files to end with A and all even to end with B. The files could have names like this:
img2001.jpg
img2002.jpg
img2003.jpg
img2004.jpg
img2005.jpg
img2006.jpg
We want the resulting filenames to end up like this:
img2001_A.jpg
img2002_B.jpg
img2003_A.jpg
img2004_B.jpg
img2005_A.jpg
img2006_B.jpg
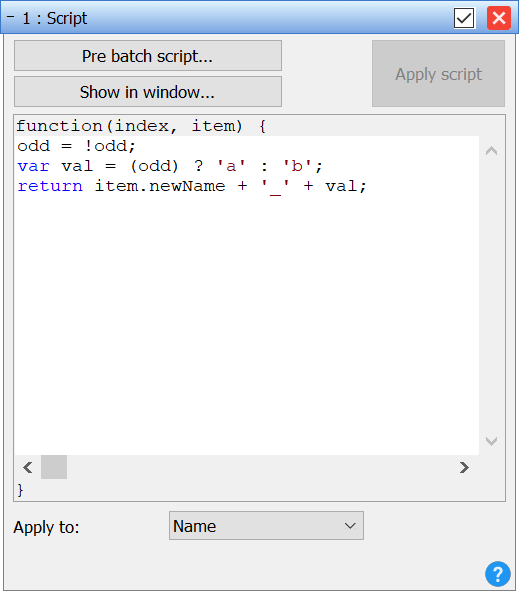
First add the files to Advanced Renamer. Then add the Script method to the method panel. Make sure this is the only method in the panel. In the script editor we can create the script needed for producing the new filenames. The script is executed once for each item in the list. The input parameter item contains the item from the list and its many properties. Typing item and hitting dot will show a list of properties on the item object.
Before creating the actual script we need to setup a global variable. This is done by clicking the Pre Batch Script button. A window displaying a new script editor will appear. The script created here will only get run once for every batch run. This is a good place to setup a global state variable. Type this into the Pre Batch Script editor:
var odd = true;
Now for the actual item script. In the script we will use the global variable named odd setup in the pre batch script, and use it to insert either A or B into the filename. Insert this script into the editor:
var str = odd ? 'A' : 'B';

odd = !odd;

return item.newBasename + '_' + str;
statement is the line telling Advanced Renamer what the new filename of the item should be. Notice that we return a complete filename including the extension. Most methods in the program is by default configured to only work with the name part of the filename, but when it comes to the scripting method, you need to return a complete filename including the extension.
This example is really simple. But to demonstrate the pre batch script I made it a bit more complicated than necessary. Try to remove the pre batch script and instead use this script in the script panel:
var str = index % 2 ? 'B' : 'A';

return item.newBasename + '_' + str;
Notice how the last line is the same but the two first lines for calculating the str variable has changed. This script will by using the index input parameter, produce the exact same result as the previous script.
So what else can we do? By using the properties of the item object we can access all information about the particular item available to the Advanced Renamer batch runner. If we also want to add the image dimensions to the filename in the script we can use a script like this (assuming we are renaming image files):
var str = index % 2 ? 'B' : 'A';

return item.newBasename + '_' + item.imgWidth + 'x' + item.imgHeight + '_' + str;
Any tag available to the program is also available in a script by using the parseTags methods of the app global object. To add an incrementing number after the base name use this script:
var str = index % 2 ? 'B' : 'A';

var i = app.parseTags('');

return item.newBasename + '_' + i + '_' + str;
The parseTags method will actually take a string containing both normal characters and tags, just like the New Name method. The rule of thumb here is, if it works with New Name method it will also work with app.parseTags.
What else can scripting method do? The answer is: Almost anything you want! It is a very powerful way of customizing the application behavior, but it requires a much larger skill set than the other methods of Advanced Renamer. For those who find the program too complicated, the scripting method will only make it even more complicated. But for those who are already skilled with programming or scripting skills, the scripting method can be of great help.
Add method
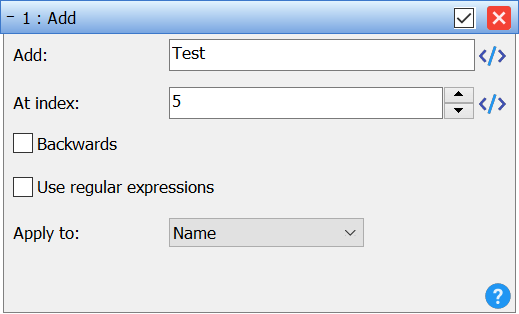 If your filename is missing some words or letters, use this method to add some extra to your filename at a given position.
Add
Specify the text that should be added.
Note: You can use tags here.
At index
Use this to tell Advanced Renamer at what position in the filename the text should be added. If you want to add it to the beginning of the file, set the index to 1. If the index is longer than the filename, the text will be added to the end. If the value is non-numeric the index will be set to the index of the pattern supplied.
Backwards
Use this to make Position count from the end of the filename. If you check this, set Apply To to name and set Position to 1, the text will be added just before the last "." (the extension separator).
Use regular expressions
If checked the "At index" value can be expressed as a regular expressions pattern. The pattern will be translated to a numeric value of the position of the pattern in the filename.
Apply To
Specifies if the change should be applied to the name, extension or both.
Attributes method
 This is not a regular renaming method. It does not change the filename. It only changes the file attributes. You can change Archive, Read Only, Hidden or System, to NoChange, Set or Unset.
This function can be useful when eg. copying files from a CD-ROM. When you copy files from a CD-ROM, all the files will be read only. You can use this method to remove the read only attribute of the files.
List method
 This is a very simple method. There are no fancy features in this method. To use it, you have to type in the new filename of every file in the list or load the new names from some external source.
Note: You can use tags in this method.
You can use the Load List and Save List buttons to load and save lists of filenames. You can load a file that contains a previous Advanced Renamer file list (a list saved by List -> Save List), but you cannot load that list with List -> Load List.
List replace method
 Works much like the replace method, but with the ability to add multiple replace pairs. This makes it easy to replace
several matches.
Works much like the replace method, but with the ability to add multiple replace pairs. This makes it easy to replace
several matches.
Use the add button too additional pairs and use the X button to remove existing pairs.
Text in the left column will be replaced with the text in the right column
Case Sensitive
If this is checked, the words "hello" and "Hello" are two different words.
If you want to replace the text no matter what case they are in, leave this box unchecked.
Use regular expressions
When checked, regular expressions can be used to replace certain patterns of the filenames.
Apply To
Specifies if the change should be applied to the name, extension or both.
Move method
 Use the move method to move a number of characters from one position to another.
Move from
Specifies the index to move from. If the file name is "my cool file name" and this value is 4, the start index will be where the letter "c" is.
Move count
The number of characters to be moved.
Move to
The position to move the characters to. If the file name is "my cool file name" and move from is 4, move count is 5, and move to is 1, then the file name will be "cool my file name".
Move relative
If checked, the value of move to will be relative to the value of move from.
Backwards
If checked, the move from is counted from the end of the filename instead of the beginning.
Use regular expressions
If checked the value of Move From, Move Count and Move To can be a regular expression search pattern.
Apply to
Specifies which parts of the filename that should be included in the rename.
New case method
 This method can change the case of the filename. This can be very useful for files used on a website or downloaded from the web.
You can specify how the case should be changed by using one of the following :
Lower case
Upper case
Upper case first letter
Lower case first letter
Upper case first letter in every word
Lower case first letter in every word
Set pattern to lower case
Set pattern to upper case
Invert case
Use Apply To, to specify which parts of the filename that should have new case.
When you choose "Uppercase first letter in every word" or "Lowercase first letter in every word", the Word Separator in the settings window specifies what separates the words in the filename.
When using the "Set pattern to lower/upper case" option the pattern text box can be used to only change the case of a part of the filename instead of the whole filename. If the use regular expressions checkbox is checked you can also specify the pattern as a regular expression.
New name method
 Use the New Name Method when you want to completely alter the filenames. This method is useful when you don't want to use any parts of the filenames and give them completely new names. Tags are used to give each file or folder in the list a unique name. Use the hyperlink buttons to insert tags that gives certain information about the files. Use the New Name Method when you want to completely alter the filenames. This method is useful when you don't want to use any parts of the filenames and give them completely new names. Tags are used to give each file or folder in the list a unique name. Use the hyperlink buttons to insert tags that gives certain information about the files.
|
|
Type in your new pattern and click the Add button. The new pattern will be added to the list. |
 Patterns
Remove method
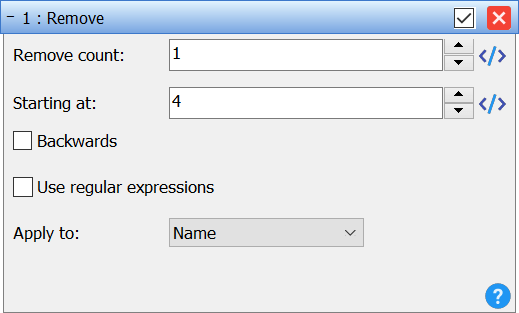 If you want to remove some of the characters of the filename, this is a good method.
Remove
Specify how many characters that should be removed. If non-numeric the value is used as a search pattern.
Starting at
Specify the starting point of the removal. If non-numeric the value is used as a search pattern.
Backwards
When checked, the Start position will be calculated from the end of the filename.
Use regular expressions
If checked the "Remove count" and "Starting at" text fields can be regular expression. The expresions are used as search patterns and translated to a numeric value.
Apply To
Specifies if the change should be applied to the name, extension or both.
Note: If you want to remove certain characters or words (like all "a"s), use the replace method instead.
Remove pattern method
 Use this method to completely remove a piece or a pattern from the filename. You can use it to remove trivial stuff like a predefined string but you can also use this method to remove more advanced patterns. You can use tags and regular expressions to specify what you want removed from the file or folder name. This method works as the Replace Method configured to replace a pattern with nothing.
See the Replace Method for more details.
Renumber method
 This method can be used to change existing numbers in file names. You cannot use this method to add new numbers, for that use the New Name or Add method.
Number position
This field decides which number in the filename you want to change. If the filename is "File_004_A_202.txt" and you set it to 2 it is the number 202 that will get changed.
Change to
The change to drop down box is used to switch between the two renumbering modes.
Absolute number is used when you want to completely renumber the files at a given start number. The New Number field decides the number for the first file.
Relative number is used when you want to add or subtract a value from the existing number. This can be handy if you have a sequence of files with gaps between some of the numbers and you want to preserve this gap. This is commonly used when a sequence starts at 0 and you want to change it to start at 1 instead.
New number (only Absolute number mode)
Defines the number of the first file. Subsequent files will get their number calculated based on this number and the index of the file in the list.
Number difference (only Relative number mode)
If you want to add 3 to the number of all files in the list set this text field to 3. If you want to subtract three from the numbers type -3 instead.
Skip (only Absolute number mode)
If set to 1 the resulting names will be 001, 002, 003, 004. If set to 2 the resulting numbers will be 001, 003, 005, 007.
Zero padding
Is used to control the padding of zeros in the new number.
Automatic (the default) will calculate the maximum length of the number and set the padding length based on this length.
When Manual is used you can use the Number Length field to specify a minimum length of the numbers.
No Padding will not add zeros to the front of the number.
Apply to
Use the apply to drop down box to tell the method in which part of the filename it should look for numbers. Can be set to Name (default), Extension, or Both.
Replace method
 If you want to remove some words or letters from the filename and replace them with something else, you can use this method. Just type in the text you want to be replaced and the text it should be replaced with. This method can also be used to remove specific phrases. To do so just leave the box Replace With blank.
Text to be replaced
This is the text that will be replaced. If you want to replace more than one phrase, you can separate the different phrases with \.
Note: You can use tags here.
Replace it with
Specify what the text in the previous box should be replaced with. If you want to remove the words and not replace them with something else, then leave this box blank.
Note: You can use tags here.
Case Sensitive
If this is checked, the words "hello" and "Hello" are two different words. If you want to replace the text no matter what case they are in, leave this box unchecked.
Use regular expressions
When checked, regular expressions can be used to replace certain patterns of the filenames. This feature is for power users only and requires basic knowledge of using regular expressions with the PCRE library.
Apply To
Specifies if the change should be applied to the name, extension or both.
Script method
The script method is probably the most advanced feature of Advanced Renamer. With this method a JavaScript experienced user can extend Advanced Renamer by writing custom methods right in the program. As with any method, the script method can be saved and opened by any other user on any other computer. Write the script in the text box and click Apply Script to see the result in the file list. The Pre Batch Script button can be used to setup prebatch variables.
Important resources:
JavaScript Reference
JavaScript Guide
Note, Advanced Renamer uses an embedded light weight JS engine, so don't expect all the features of a full blown JS engine.
How to use
The script in the method panel will get executed once for every file or folder in the list in the order the files are sorted in the list. The parameter "index" contains the number the item in the list has. The parameter "item" is an object representing an item in the list and contains every piece of information Advanced Renamer knows about this file or folder. The information can be used to create a new filename which will be set by returning the new filename. Remember the new filename must contain the extension of the file.
Objects specific to Advanced Renamer:
The app object has the following properties and methods:
| app.currentIndex [readonly] | The index of the currently processed item in the list. |
| app.currentItem [readonly] | The currently processed item in the list. |
| app.exifToolValue(tag): string | Returns the value of the specified tag from the ExifTool. |
| app.getItem(index) | Returns the item at the specified index. |
| app.itemCount [readonly] | The number of items in the list. |
| app.log(message) | Writes a message to the log. To see the log messages, open the JS console through the button in the main toolbar. |
| app.logItem(item) | Writes a message to the log containing the item. |
| app.parseTags(tabs): string | Parses the specified string for tags and returns the result. |
| app.prevItem [readonly] | The previous item in the list. |
Swap method
 The Swap method can swap two parts of a filename divided by a separator. The method can be useful when you want to change "Michael Jackson - Thriller.mp3" to "Thriller - Michael Jackson.mp3".
Separator
The separator used to divide the two parts of the filename. Everything on either side will get swapped.
Occurence
If the separator exists more than once in the filename you can use this control to define which occurence of the divider to use when swapping.
Timestamp method
 With the timestamp method you can change the date and time of the filename. You can either change it to a fixed date/time, a date/time relative to the current date/time of the file, date/time from EXIF tags in images, or a pattern in the filename.
Apply to
A file contains three different date/time values. One for when the file was originally created, one for when it was last access, and one for when it was last modified. Use these checkboxes to select which date/time values you want to change. You can check more than one of them, but at least one has to be selected.
Image date and time
If this is checked and the files in the list are image files the date and time value will be set to the EXIF date taken value found inside the image file.
Absolute date and time / Delte date and time
This determines if the values of the edit fields below are the absolute time or if the values are relative to the files current date and time.
Note: When you change from absolute to delta time, you should review the values of the edit fields.
Filename pattern / Dirname pattern
When checked a pattern edit field will be visible in the bottom. In this field a pattern for how the date and time values can be retrieved from the file or parent directory name. The tags <Year>, <Month>, <Day>, <Hour>, <Min>, and <Sec> have special meaning in this method. They are used to specify how the date and time parts are recognized in the name.
Example: If you have a filename with year, month, and day values in the name and you want to set the file date to this date and the filename is "Summer at the lake 2011-04-01.jpg" the pattern <Year>-<Month>-<Day> will automatically retrieve the date.
Regular tags can also be used in the pattern, but note that the six date and time tags have special meaning here.
Day / Month / Year / Hour / Min / Sec
When absolute or relative date/time is checked you can specify individual time parts in these six fields. If Delta Date and Time is checked, these values are either added to or subtracted from the file date/time. If you type 1 in Hour, 1 hour is added to the date/time and if you type -1, 1 hour is subtracted from the date/time.
Trim method
 Use this method to remove unwanted spaces, dashes, and other unwanted characters from the beginning and end of the filename. Sometimes when using many methods you end up with too many spaces in either end of the filename. To avoid this, use this method.
Default tags
| <Inc Nr:x:y> | Will insert an increasing number starting with X and up. X can be any number value.
If you have e.g. 200 files in the list, the program will add leading zeros to all files
below 100 like this 001, 002, 003 etc. If you don't want leading zeros you can turn them
off in Settings Dialog. To force a certain number of zeros,
set the value of X like this 001 for a number length of 3. Default value for X is 1. The second optional parameter Y can be used to define the stepping of the increasing number. When used like <Inc Nr:1:2> the results will be 001, 003, 005, 007 etc. |
| <Inc NrDir:x:y> | Acts like <Inc Nr> with the exception that this function counts per folder. Default value for X is 1. The behaviour of the optional parameter Y is the same as the parameter Y for the <Inc Nr> tag. |
| <Inc Alpha:x:y> | Will insert an increasing letter starting with X and up. X can be any letter value. If you use a small letter, it will use small letters in all the files and big letters if you use a big on. Note: This function can only go up to Z. If you have more files, an error will occur. Default value for X is A. The behaviour of the optional parameter Y is the same as the parameter Y for the <Inc Nr> tag. |
| <Name> | Inserts the original name of the file. Not the path and not the extension, only the name. e.g. if you have a file called "c:\windows\notepad.exe", this command's result will only be "notepad". |
| <Ext> | Will insert the original files extension. Notice that this tag does not include the ".". e.g. if you have a file called "c:\windows\notepad.exe", the result of <Ext> will be "exe". |
| <DirName:x> | Inserts the last directory name. eg. "c:\windows\notepad.exe" will give "windows" as result. If X is a numeric value that value will be used to select a folder name in the sequence from the right part of the path. If using a negative number for X the folder name is selected from the left to right.. <Dirname:3> for "c:\programs\games\new\mine sweeper\highscore\file.txt" will yield "new" <Dirname:4> for "c:\programs\games\new\mine sweeper\highscore\file.txt" will yield "games" <Dirname:-1> for "c:\programs\games\new\mine sweeper\highscore\file.txt" will yield "programs" |
| <Num Files:x> | This will insert a number telling how many files there is in the directory where the file is located. Like the <Inc Nr>, this function is zero padded. To manually override the zero padding, use the x parameter, xxx will zero pad to 3 digits. New in version 3.92 Note: It does not include other directories. |
| <Num Dirs:x> | This will insert a number telling how many sub-directories there is in the directory where the folder is located. Note: This only works on folders. Like the <Inc Nr>, this function is zero padded. To manually override the zero padding, use the x parameter, xxx will zero pad to 3 digits. New in version 3.92 |
| <Num Items:x> | Inserts the total number of items in the list. Like the <IncNr>, this function is zero padded. To manually override the zero padding, use the x parameter, xxx will zero pad to 3 digits. New in version 3.92 |
| <Word:x> | Will insert a word from the filename index by X. <Word:3> will insert the third word of the filename. Word are separated by values present in the word separator text field in the settings dialog. Default value for X is 1. |
Advanced tags
This is more advanced tags for the more advanced users because they are more difficult to use.
| <ExifTool:value> | Insert value from the external program ExifTool. VALUE is the name of the ExifTool tag to be used. |
| <Substr :pos:count:start> |
Will insert a part of the original filename into the new name. The POS and COUNT parameters are used to define what part of the filename that will get copyed. Example of use: <Substr:5:2> will return "wa" for the filename "The walking man.txt". The parameters don't have to be numeric indexes, they can also be text strings to search for in the filename. Example of use: <Substr:ki:an> will return "ng m" for "The walking man.txt". The following will yield the same result: <Substr:ki:4> In the rare cases where you actually want to search for a number in the filename you can put the search term in quotes. Example of use: <Substr:"2":2> will return "nd" for "The 2nd door.txt". The optional START parameter will define where to start searching the name. Example of use: <Subtr:".":5:3> will return "Story" for "A.Cool.Story.txt" |
| <RSubstr :pos:count:start> |
Works exactly as the <Substr> tag but searches the string backwards. Example of use <RSubstr:2:3> for "A cool baby" will return "bab" |
| <Csv:x> | When data has been imported with the "Import data from CSV" functionality in the Import menu, the values
can be used with this tag. The X is a numeric value representing the column index with the first column
having numeric value 1. Also take a look at this page. |
| <Rand:min:max> | Inserts a random number. MIN and MAX can be used to specify a minimum and a maximum range. |
| <Rand Str:length> | Inserts a random string. Use the LENGTH value to specify the length of the string. Uses the values from a to z in lower case to produce the random string. |
| <Inc Hex:x:y> | Will insert an incrementing hex based number starting with X and up. X can be any number value. Note X should be a decimal number, not a hex based number. For more information, see <Inc Nr> tag.
Default value for X is 1. |
| <Inc Roman:x:y> | Will insert an incrementing roman numeral starting with X and up. X can be any number value. Note X should be a decimal number, not a roman numeral. For more information, see <Inc Nr> tag.
Default value for X is 1. |
| <Dec Nr:x:y> | Works like the <Inc Nr> tag but ads a decrementing number instead of an incrementing one. The X value is used to tell the program what the
starting number will be and Y is the step value between each file. |
| <File Content :pos:count:filename> |
Will insert a text phrase from a file. It will use the text starting a position POS in the filename and copy COUNT characters. If FILENAME is specified, Advanced Renamer will search for the text phrase in that file. If FILENAME is omitted the file which is being renamed is used. If FILENAME is specified it must be quoted with ". Examples of use: <File Content:46:12:"c:\program files\files\myfile.txt"> <File Content:56:9> Note: FILENAME is optional. POS and COUNT is required. |
| <File Line:x> | Will insert a line of text from the file. The parameter X is the line number, starting from 1. Note, do not use on binary files. |
Datetime tags
Inserts the value belonging to the tag based on the computers local time and date. They are very self explained. Remember that these values are calculated at start of rename and not when the file is actually renamed. All tags except <Year> have a length of two characters at all time.
|
<Date:format> <Time:format> |
Format date and time based on format string. yy: 2 digit year yyyy: 4 digit year m: Month mm: 2 digit month with leading zero mmm: Month as text, short mmmm: Month as text, long d: Day dd: 2 digit day with leading zero ddd: Day of week as text, short dddd: Day of week as text, long h: Hour hh: 2 digit hour with leading zero n: Minute nn: 2 digit minute with leading zero s: Second ss: 2 digit second with leading zero |
| <Time:format> | |
| <Sec> | |
| <Min> | |
| <Hour> | |
| <Day> | |
| <Month:x> |
The optional parameter can be used to specify another format than the standard leading zeros format. Possible parameter values: 0: No leading zeros. 00: Leading zeros xxx: Short textual (jan, feb etc.) Xxx: Short textual with starting capital letter (Jan, Feb etc.) XXX: Short textual in capital letters (JAN, FEB etc.) xxxx: Long textual (january, february etc.) Xxxx: Long textual with starting capital letter (January, February etc.) XXXX: Long textual in capital letters (JANUARY, FEBRUARY etc.) |
| <Year:x> | Set X to 00 to force the year value into a 2 digit value |
| <UnixTimestamp> |
Datetime created tags
Use these tags to insert the created date or time of the file or folder. All tags except <Year Created> has a length of two characters at all time.
|
<Date Created:format> <Time Created:format> |
See <Date> tag for a description of the parameter. |
| <Sec Created> | |
| <Min Created> | |
| <Hour Created> | |
| <Day Created> | |
| <Month Created:x> | See <Month> tag for a description of the parameter. |
| <Year Created:x> | See <Year> tag for a description of the parameter. |
| <UnixTimestamp Created> |
Datetime modified tags
Use these tags to insert the modified date or time of the file. These work the same way as the Date/Time Created Tags. All tags except <Year Modified> have a length of two characters at all time.
Note: These tags do not work on folders.
|
<Date Modified:format> <Time Modified:format> |
See <Date> tag for a description of the parameter. |
| <Sec Modified> | |
| <Min Modified> | |
| <Hour Modified> | |
| <Day Modified> | |
| <Month Modified:x> | See <Month> tag for a description of the parameter. |
| <Year Modified:x> | See <Year> tag for a description of the parameter. |
| <UnixTimestamp Modified> |
Image tags
These tags only work on a selected amount of image files. Some tags, like the width and height, work on most images, other tags like Author and Copyright needs valid Exif information embedded in the image files. Also note that not all tags are supported by all cameras.
| <Img Year:x> <Img Month:x> <Img Day> <Img Hour> <Img Min> <Img Sec> |
Use these tags to insert date and time values for the date the picture was taken.
See <Month> tag for a description of the parameter for the <Img Month> tag. |
| <Img Subsec> | Will insert the subsecond part of the EXIF information. This value is not always present in jpeg files but some cameras will add this value when taking pictures in burst mode. |
|
<Img DateOriginal:format> <Img DateCreate:format> <Img TimeOriginal:format> <Img TimeCreate:format> |
See <Date> tag for a description of the parameter. |
| <Img DPI> | Inserts the image resolution as dots per inch. |
| <Img Width> | Inserts the image width if possible. |
| <Img Height> | Inserts the image height if possible. |
| <Img Width Inch> <Img height Inch <Img Width Cm> <Img Height Cm> <Img Width Mm> <Img Height Mm> |
These tags are special width/height tags for adding the width or height in inches, centimeters, or millimeters to the filename. The width and height in pixels are used with the DPI resolution embedded in metadata in the file. If no DPI-value is present 72 is used as a default. |
| <Img Author> | Inserts the Author value of the EXIF-information of the image. |
| <Img Copyright> | Inserts the Copyright value of the EXIF-information of the image. |
| <Img Subject> |
Inserts the Subject value of the EXIF-information of the image. |
| <Img Title> |
Inserts the Title value of the EXIF-information of the image. |
| <Img Aperture> | |
| <Img Brightness> | |
| <Img FocalLength> |
|
| <Img ISO> |
|
| <Img ShutterSpeed> |
|
| <Img ExposureTime> |
|
| <Img Contrast> |
Resulting values can be: Soft, Normal, Hard |
| <Img ExposureMode> |
Resulting values can be: Auto exposure, Manual exposure, Auth bracket |
| <Img ExposureProgram> |
Resulting values can be: Not defined, Manual, Normal program, Aperture priority, Shutter speed, Creative program, Action program, Portrait mode, Landscape mode |
| <Img Saturation> |
Resulting values can be: Low, Normal, High |
| <Img Sharpness> |
Resulting values can be: Soft, Normal, Hard |
| <Img WhiteBalance> |
Resulting values can be: Auto, Manual |
Video tags
Video tags can be used to extract information from video and movie files. Note, not all video types and codecs are supported.
| <Video Width> | Inserts the width of the video. |
| <Video Height> | Inserts the height of the video. |
| <Video FrameRate> | Number of frames per second. |
| <Video Title> | |
| <Video Genre> | |
|
<Video Date:format> <Video Time:format> |
See <Date> tag for a description of the parameter. |
| <Video Date Year:x> <Video Date Month:x> <Video Date Day> <Video Date Hour> <Video Date Min> <Video Date Sec> |
Use these tags to insert date and time values for the date the video was produced.
See <Month> tag for a description of the parameter for the <Video Date Month> tag. |
| <Video Duration> | The total duration of the video formatted in hours, minutes, and seconds |
| <Video Hour> | The hour time part of the video duration. Use parameter to control zero padding: <Video Hour:0> |
| <Video Min> | The minute time part of the video duration. Use parameter to control zero padding: <Video Min:0> |
| <Video Sec> | The second time part of the video duration. Use parameter to control zero padding: <Video Sec:0> |
Document tags
Tags used for document based files. Documents include PDF, Word and PowerPoint presentation.
| <Doc Pages:x> New in version 3.92 |
The number of pages in the document or the number of slides in a presentation. Use the parameter to zero pad the output <Pages:xxx> will result in numbers with a minimum length of 3. No parameter will not pad the number with zeros. |
| <Doc Creator> New in version 3.92 |
Document creator, if available. |
| <Doc Title> New in version 3.92 |
Document title from metadata, if available. |
ID3 tags
These tags only work on MP3 files with an ID3 Tag. These tags will insert the ID3 Tag into the filename. If a file contains both ID3v1 and ID3v2, only one of them is used. Use the Settings Dialog to change in which order Advanced Renamer should look for these tags.
Note: If the tag consists of letters that are not allowed in a filename, they are replaced with "_". It can be changed in the Settings Dialog.
| <ID3 Album> | |
| <ID3 Artist> | |
| <ID3 Genre> | |
| <ID3 Title> | |
| <ID3 Track> | |
| <ID3 Year> | Year of the release |
| <ID3 Disc> |
GPS location tags
Some digital cameras record GPS coordinates as an Exif tag in the pictures they take. This is especially true for cameras in smart phones like iPhones and Android based phones.
The Country, City, and State tags use the GPS coordinates to lookup a textual representation of where the picture was taken in an online database containing more than 100,000 cities. A functioning internet connection is needed to use this functionality. When using the City tag the closest city with a population of at least 1000 people will be used.
Please note that the accuracy of the GPS position might be a little off. This is because it can take some time for the camera to find the GPS satellites and measure the exact location. The accuracy is not very important when using the City, State, and Country tags.
| <GPS Country> | The country in which the picture was taken. |
| <GPS Country Short> | Short version of <GPS Country>. |
| <GPS City> | The nearest city to where the picture was taken. |
| <GPS State> | The state in which the picture was taken. For countries outside the US this value might be blank or contain a region instead. |
| <GPS Lat> | The GPS latitude as a decimal number with four significant decimals. |
| <GPS Lat Deg> | The degrees of the latitude. |
| <GPS Lat Min> | The minutes of the latitude. |
| <GPS Lat Sec> | The seconds of the latitude. |
| <GPS Lat Dir> | The latitude direction. Posible values are N and S. |
| <GPS Lng> | The GPS longitude as a decimal number with four significant decimals. |
| <GPS Lng Deg> | The degrees of the longitude. |
| <GPS Lng Min> | The minutes of the longitude. |
| <GPS Lng Sec> | The seconds of the longitude. |
| <GPS Lng Dir> | The longitude direction. Posible values are W and E. |
| <GPS Alt> | GPS altitude. |
File size tags
These tags can be used to insert the size of a file at the time of rename into the filename.
The X parameter is used to specify zero padding of the value. <Filesize Kb:xxx> will result in a value of minimum 3 digits. New in version 3.92
| <Filesize:x> | File size in bytes. |
| <Filesize Kb:x> | File size in kilo bytes. |
| <Filesize Mb:x> | File size in mega bytes. |
| <Filesize Gb:x> | File size in giga bytes. |
| <Filesize Tb:x> | File size in tera bytes. |
Checksum tags
Calculation of file checksum. Checksum values can be used to verify the contents of a file and avoid corruption.
| <MD5> | MD5 file checksum value. |
| <SHA1> | SHA-1 file checksum value. |
| <SHA256> | SHA-256 file checksum value. |
Executable tags
Tags for extracting information from program executables. Note, will only work with Windows executables.
| <Exe Product> New in version 3.94 |
Product name, ex "Advanced Renamer" |
| <Exe ProductVersion> New in version 3.94 |
Product version, ex "3.94" |
| <Exe FileVersion> New in version 3.94 |
Version of the file. Typically longer containing a build version, ex "3.94.0.0" |
| <Exe Company> New in version 3.94 |
The company that made the program |
| <Description> New in version 3.94 |
A description of what the program does |
Batch modes

Advanced Renamer was initially made for the purpose of mass renaming files and folders. From version 3.0 it is also possible to move and copy files using the same naming technology. The batch mode drop down box is located above the files. When copy or move mode is selected a edit field will appear to the right. This field is used to specify the output folder. The clever part is that tags known from renaming methods can also be used here. Any non existing folder part will be created when the file is moved or copied.
Example of use:
When the pattern below is used all the files will be located in a folder based on when the file was initially created.
c:\temp\output\<Year created>\<Month created>
The tags <Substr> and <RSubstr> are especially useful here.
Columns
 When you right click the column header, a popup menu will appear. In that menu, you can choose which columns you want shown.
Note: The column Name cannot be removed.
If you want the columns to be shown in a different order, you can drag the column headers to new positions. All columns, except for the Name column, can be dragged.
You can also sort the content of the columns by clicking on them. If you click one more time, it will sort in reverse order.
Note: Not all columns can be sorted.
Note: When you add new files, the new files will not be sorted automatically.
The columns can be dragged when there are no files in the list and when there are files in the list. But it is recommended to set up the columns before adding files to gain higher performance.
If you click the Customize item in the list, you will see the Customize Columns Dialog (shown below). You can use this dialog for easier control of the columns. Using this dialog will also increase the performance of column settings.
Use the checkboxes in the Columns List to set whether the column should be shown or not. Use the 4 buttons (Top, Up, Down, Bottom) to move the items.
Note: The column Name cannot be moved.
To the left you can choose between different predefined column sets. Click one and the settings for that column set will be shown in the Columns List.

It is also possible to use the Save Button to save a new set based on your settings. When you click the Save button, you are asked for a Column Set Name. Type a new name if you want to save it as a new set or type an existing name to overwrite an existing column set.
Command line automation
If you need to perform batches by automatically, like in a server environment, you can use the command line automation tool. The tool can be used to perform a batch defined by a previously saved batch method file.
In the Advanced Renamer folder you will find the file arenc.exe Start a shell and run the arenc.exe with the -h switch to get additional information.
Syntax: arenc [options]
Example: arenc -e batch.aren -p "c:\temp"
-h, -help: Display help.
-v, -verify : Verify results. Only test the batch.
-e, -execute <method list file> : Execute batch method list file.
-t, -type <files|folders> : Perform batch on files or folders. Default: files.
-p, -path <folder path> : Folder to perform batch on. Cannot be used with -i.
-s, -subs : Also add items from sub folders. Only with -p.
-i, -items <items file> : File containing files or folders to execute batch on. Cannot be used with -p.
-f, -files <file1;file2...> : List of files (separated by ;) to perform the batch on. Cannot be used with -u or -p.
-o, -order <column> : Column to sort items by. Default: filename. For more info type: arenc help order.
-od, -orderdesc : Order in reverse order.
-l, -log <log file> : File to output batch result to.
-m, -mode <rename|copy|move> : Batch mode. Default: rename.
-d, -destination <destination folder> : Destination folder when using -m copy or -m move.
-msk, -mask <mask1;mask2...> : Only perform batch on files matching this mask. Only with -p.
-r, -regex : Only perform batch on files matching this regular expression. Only with -p.
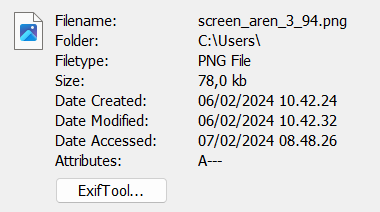
ExifTool

ExifTool is a program by Phil Harvey (exiftool.org) distributed with Advanced Renamer to create support for more file formats like raw camera files, documents, zip files etc. ExifTool supports both more formats and more tags which can be used to mass rename files through Advanced Renamer.
Tag values can get investigated by selecting a file and clicking the ExifTool button in the Fileinfo box. From here you can copy a <ExifTool:> tag and paste it into a method of choice.
At the time of writing ExifTool supports the following file formats:

| 3FR | Hasselblad RAW |
| 3G2, 3GP2 | 3rd Gen. Partnership Project 2 audio/video |
| 3GP, 3GPP | 3rd Gen. Partnership Project audio/video |
| ACR | American College of Radiology ACR-NEMA |
| AFM, ACFM, AMFM | Adobe [Composite/Multiple Master] Font Metrics |
| AI, AIT | Adobe Illustrator [Template] |
| AIFF, AIF, AIFC | Audio Interchange File Format [Compressed] |
| APE | Monkey's Audio |
| ARW | Sony Alpha RAW |
| ASF | Microsoft Advanced Systems Format |
| AVI | Audio Video Interleaved |
| BMP, DIB | Windows BitMaP / Device Independent Bitmap |
| BTF, TIFF, TIF | BigTIFF |
| CHM | Microsoft Compiled HTML format |
| COS | Capture One Settings |
| CR2 | Canon RAW 2 |
| CRW, CIFF | Canon RAW Camera Image File Format |
| CS1 | Sinar CaptureShop 1-shot RAW |
| DCM, DC3, DIC, DICM | DICOM - Digital Imaging and Communications in Medicine |
| DCP | DNG Camera Profile |
| DCR | Kodak Digital Camera RAW |
| DFONT | Macintosh Data Fork Font |
| DIVX | DivX media format |
| DJVU, DJV | DjVu image |
| DNG | Digital Negative |
| DOC, DOT | Microsoft Word Document/Template |
| DOCX, DOCM | Office Open XML Document [Macro-enabled] |
| DOTX, DOTM | Office Open XML Document Template [Macro-enabled] |
| DYLIB | Mac OS X Mach-O executable and library files |
| DV | Digital Video |
| DVB | Digital Video Broadcasting |
| EIP | Capture One Enhanced Image Package |
| EPS, EPSF, PS | [Encapsulated] PostScript Format |
| ERF | Epson RAW Format |
| EXE, DLL | DOS/Windows executable and library files |
| EXIF | Exchangable Image File Format metadata |
| EXR | Open EXR |
| F4A, F4B, F4P, F4V | Adobe Flash Player 9+ Audio/Video |
| FFF | Hasselblad Flexible File Format |
| FLA | Macromedia/Adobe Flash project |
| FLAC | Free Lossless Audio Codec |
| FLV | Flash Video |
| FPX | FlashPix image |
| GIF | Compuserve Graphics Interchange Format |
| GZ, GZIP | GNU ZIP compressed archive |
| HDP, WDP | Windows HD Photo / Media Photo |
| HDR | Radiance RGBE High Dynamic-Range |
| HTML, HTM, XHTML | [Extensible] HyperText Markup Language |
| ICC, ICM | International Color Consortium color profile |
| IDML | Adobe InDesign Markup Language |
| IIQ | Phase One Intelligent Image Quality RAW |
| IND, INDD, INDT | Adobe InDesign Document/Template |
| INX | Adobe InDesign Interchange |
| ITC | iTunes Cover Flow artwork |
| J2C, JPC | JPEG 2000 codestream |
| JP2, JPF, J2K, JPM, JPX | JPEG 2000 image [Compound/Extended] |
| JPEG, JPG | Joint Photographic Experts Group image |
| K25 | Kodak DC25 RAW |
| KDC | Kodak Digital Camera RAW |
| KEY, KTH | Apple iWork '09 Keynote presentation/Theme |
| LA | Lossless Audio |
| LNK | Microsoft Shell Link |
| M2TS, MTS, M2T, TS | MPEG-2 Transport Stream |
| M4A, M4B, M4P, M4V | MPEG-4 Audio/Video |
| MEF | Mamiya Electronic Format |
| MIE | Meta Information Encapsulation |
| MIFF, MIF | Magick Image File Format |
| MKA, MKV, MKS | Matroska Audio/Video/Subtitle |
| MOS | Creo Leaf Mosaic |
| MOV, QT | Apple QuickTime Movie |
| MP3 | MPEG-1 layer 3 audio |
| MP4 | Motion Picture Experts Group version 4 |
| MPC | Musepack Audio |
| MPEG, MPG, M2V | Motion Picture Experts Group version 1 or 2 |
| MPO | Extended Multi-Picture format |
| MQV | Sony Mobile QuickTime Video |
| MRW | Minolta RAW |
| MXF | Material Exchange Format |
| NEF | Nikon Electronic Format |
| NMBTEMPLATE | Apple iWork '09 Numbers Template |
| NRW | Nikon RAW |
| NUMBERS | Apple iWork '09 Numbers spreadsheet |
| ODB, ODC, ODF, ODG, ODI, ODP, ODS, ODT |
Open Document Database/Chart/Formula/Graphics/ Image/Presentation/Spreadsheet/Text |
| OFR | OptimFROG audio |
| OGG, OGV | Ogg bitstream container |
| ORF | Olympus RAW Format |
| OTF | Open Type Font |
| PAC | Lossless Predictive Audio Compression |
| PAGES | Apple iWork '09 Pages document |
| PCD | Kodak Photo CD Image Pac |
| Adobe Portable Document Format | |
| PEF | Pentax Electronic Format |
| PFA, PFB | PostScript Font ASCII/Binary |
| PFM | Printer Font Metrics |
| PGF | Progressive Graphics File |
| PICT, PCT | Apple Picture file |
| PMP | Sony DSC-F1 Cyber-Shot image |
| PNG, JNG, MNG | Portable/JPEG/Multiple-image Network Graphics |
| PPM, PBM, PGM | Portable Pixel/Bit/Gray Map |
| PPT, PPS, POT | Microsoft PowerPoint Presentation/Slideshow/Template |
| POTX, POTM | Office Open XML Presentation Template [Macro-enabled] |
| PPSX, PPSM | Office Open XML Presentation Slideshow [Macro-enabled] |
| PPTX, PPTM | Office Open XML Presentation [Macro-enabled] |
| PSD, PSB | PhotoShop Drawing / Large Document |
| PSP, PSPIMAGE | Paint Shop Pro |
| QTIF, QTI, QIF | QuickTime Image File |
| RA | Real Audio |
| RAF | FujiFilm RAW Format |
| RAM, RPM | Real Audio/Plug-in Metafile |
| RAR | RAR Archive |
| RAW | Kyocera Contax N Digital RAW |
| RAW | Panasonic RAW |
| RIFF, RIF | Resource Interchange File Format |
| RM, RV, RMVB | Real Media/Video [Variable Bitrate] |
| RSRC | Mac OS Resource |
| RTF | Rich Text Format |
| RW2 | Panasonic RAW 2 |
| RWL | Leica RAW |
| RWZ | Rawzor compressed image |
| SO | Unix ELF executable and Shared Object files |
| SR2 | Sony RAW 2 |
| SRF | Sony RAW Format |
| SRW | Samsung RAW format |
| SVG | Scalable Vector Graphics |
| SWF | Shockwave Flash |
| THM | Canon Thumbnail |
| THMX | Office Open XML Theme |
| TIFF, TIF | Tagged Image File Format |
| TTF, TTC | True Type Font/Collection |
| VOB | Video Object |
| VRD | Canon DPP Recipe Data |
| VSD | Microsoft Visio Drawing |
| WAV | Windows digital audio WAVeform |
| WEBM | Google Web Movie |
| WEBP | Google Web Picture |
| WMA, WMV | Windows Media Audio/Video |
| WV | WavePack lossless audio |
| X3F | Sigma/Foveon RAW |
| XCF | GIMP native image format |
| XLS, XLT | Microsoft Excel Spreadsheet/Template |
| XLSX, XLSM, XLSB | Office Open XML Spreadsheet [Macro-enabled/Binary] |
| XLTX, XLTM | Office Open XML Spreadsheet Template [Macro-enabled] |
| XMP | Extensible Metadata Platform sidecar file |
| ZIP | ZIP archive |
File pairs

In the program menu you can activate file pair renaming. This will make sure file pairs will keep being paired together.
So what is a file pair? A file pair is when two or more files are located in the same folder and differ on the extension. The
following is a file pair:
Img_001.jpg
Img_001.tif
This is tree pairs:
Img_00A.jpg
Img_00A.tif
Img_00B.jpg
Img_00B.tif
Img_00C.jpg
Img_00C.tif
File pairs can be common when working with image files, where the same image may exist in different formats. Some cameras may produce both a JPEG file and a RAW file. This is also common for video files.
You can also use this mode to transfer metadata from a media file to a paired file. Imaginge using this pattern in the New Name method:
Img_<Img Width>x<Img Height>_<Inc Nr:002>
For this pair:
Picture_2027.jpg
Picture_2027.txt
The result will be:
Img_2000x1000_002.jpg
Img_2000x1000_002.txt
Note, the media file must be located before the paired file in the list.

Hotkeys
| F1 | Show this user guide |
| F2 | Override new filename of selected items |
| F5 | Refresh the list |
| F9 | Start batch |
| Del | Remove the selected file(s) from the list |
| Ins | Add file(s) to the list |
| Ctrl + Alt + Up | Move selected file(s) up |
| Ctrl + Alt + Down | Move selected file(s) down |
Metadata write
You can use the metadata write functionality to change existing metadata of files. Select Metadata in the menu and you will see the window below. Choose the tag to change and fill in the value of "New value". When finished click "Start batch".If all files should have the same value, you can click the action button and click "Copy value to all".
Note! You can only change metadata fields, like Exif metadata, that already have values. You cannot add new fields. It is recommended to backup all the files prior to running a metadata write batch.
Also note, this will only work on some file formats. Will not work with ID3 tags in MP3 files.

Name collision rules

When making new names there is a chance of two files ending up with the same name. The default behavior is to fail and not rename the file but you can change this behavior by applying a different name collison rule. The 4 rules are described below.
Fail
Don't let Advanced Renamer rename files with a name collision. This is the default behavior.
Append incrementing number
Will append a incrementing number grouped by similar filenames. If the resulting new names are as follows:
Foo.txt
Foo.txt
Bar.txt
Bar.txt
Bar.txt
The corrected names will be:
Foo.txt
Foo_001.txt
Bar.txt
Bar_001.txt
Bar_002.txt
Append image sub second
Will append the Exif value Image Sub Second (if present) to files with the same name.
Append pattern
When using this collison rule a text box will allow you to supply a pattern containing tags that should be applied to the end of all files with a collision.
New name
When a collision is detected, generate a completely new name based on the pattern supplied in the text box.
Regular expressions
A regular expression language is a powerful way of manipulating with texts. Advanced Renamer supports the use of regular expressions for pattern searching and replacing in several methods. The use of these expressions is primarily meant for power users and people with programming experience but none the less gaining knowledge of the basics will prove to be very rewarding. A standard library called PCRE is used which means that people with prior knowledge of this library will feel right at home. Those learning this for the first time will also be able to use the skills in other similar tools.
This page will try to give you basic knowledge about the use of regular expressions in the context of file renaming.
A simple regular expression
A regular expression contains normal characters and metacharacters. The normal characters are interpreted as they are while the metacharacters have special meaning. Let's start out with a simple expression:
zip_\d\d\d\d
Given the expression above the resulting match of a filename "BayTower_zip_4500.txt" will be "zip_4500". The "\d" is a metacharacter which represent any numeric value raging from 0 to 9. The above expression matches any phrase starting with "zip_" followed by 4 digits.
How can we use this for renaming?
The most common method with regex support is the Replace method. If you in the first text field type the above expressions "zip_\d\d\d\d" and in the second text field type "zip_unknown" any file containing "zip_" followed by 4 digits will get this text phrase replaced by "zip_unknown".
Sequences
What if we don't know how many numbers a zip code consists of? What if some files contain "zip_123" and others "zip_384739"? The above expression will only match if there are exactly 4 digits. If we don't know how many digits there are we can use another meta character. Consider this expression:
zip_\d+
The plus + will match the previous character 1 or more times which means that this expression will match "zip_123" and "zip_1234" and "zip_8000000".
Grouping
It is possible to define subpatterns within the pattern itself which proves very useful when using the replace method. A group is defined by enclosing a part of the pattern in a parenthesis (). Given this pattern:
zip_(\d+)
The match is exactly the same as before except now we can access the value of the subpattern in a replace scenario. If in the replace method we put "\1_zip" in the second text field the result will show that the two parts of the filename have changed place. If the filename contains "zip_123" the filename will contain "123_zip" after the method has been applied. The value of the special metacharacter \1 is in this case "123" . If more than one group is used the next group name will be \2.
A more advanced example
If we have a filename like this "Michael Jackson - Thriller.mp3" and we want to change it to something like this "Thriller - Michal Jackson.mp3" we can apply a regular expression in the replace method like this:
Text to be replaced: (.*) - (.*)
Replace with: \2 - \1
In this case some familiar notation is used but also two new metacharacter. The dot matches anything character digit or non-digit. The star * matches the previous character 0 or more times. The pattern is build of two similar groups divided by - . The first group matches "Michal Jackson" and putting it into \1 while the second group matches "Thriller" putting it into \2. Because the first group is replaced by the value of the second and vice versa, the two parts of the filename change place.
Metacharacters
| \w | Word character [a-zA-Z_] |
| \W | Non-word character [^a-zA-Z_] |
| \d | Digit character [0-9] |
| \D | Non-digit character [^0-9] |
| . |
Any character |
| ^ | Start of line (start of filename) |
| $ | End of line (end of filename) |
| [...] | Characters contained in list. E.g. [abcd] |
| [^...] | Characters not contained in list. E.g. [^abcd] |
| (...) | Subpattern group. E.g. (.*) |
| (...|...) | Subpattern group alternation. E.g. (\d*|\D*) |
| * | Match previous character or metacharacter 0 or more times |
| + | Match previous character or metacharacter 1 or more times |
| ? | Match previous character or metacharacter 0 or 1 times |
| {n} | Match previous character or metacharacter exactly n times. E.g. \d{4} |
| {n,} | Match previous character or metacharacter at least n times. E.g. \d{3,} |
| {n,m} | Match previous character or metacharacter at least n times but no more than m times. E.g. \d{3,5} |
| \1 | Sub pattern value 1 for use in pattern based replace |
The List
Files vs. Folders
You cannot rename both files and folders at the same time. You can choose between Files View or Folders View by using the two buttons above the list.
 Add Files
There are several ways to add files to the list. You can drag files from Explorer or any other file manager. You can also click Add in the toolbar or in the right click menu or click the Insert button on your keyboard, and select the files you want to add from the open files dialog.
Add all Files in a Directory
You can also choose to select all files in a directory by clicking first Add then Directory in the toolbar. A dialog like the one to the right will appear.
If you want all files in subdirectories to be added as well, you can check the Include Subdirectories checkbox.
Use the Mask box to specify what file types you want to add. If you want to add more than one file type, you can separate them by ; ( eg. *.jpg;*.gif ). If you want to add all files, just leave the Mask blank.
Note: This is not possible when you are in Folders View.
Add Folders
To add a folder to the Folders View, the best way is to drag them from Explorer or any other file manager. Another way is to click Add and then Directory in the toolbar. That is the same as right clicking in the list and choose Add or just hitting the Insert button on your keyboard.
Remove Items
To remove items from the list, you just select them and select Remove from the right click popup menu. Or you can use the Delete button on your keyboard.
Move Items
It is also possible to move the items to another position in the list. It is only possible to drag one item to a new position, but if you use CTRL + UP or Down, you can move all selected items either up or down.
Save List
If you want to save the list for later use, you can either click List -> Save in the toolbar or you can right click and choose Save List. The list will be saved in a regular text file, which can be opened in any text editor.
Load List
To load a list of files, click List -> Load in the toolbar or right click and choose Load List. The list does not have to be a list saved by Advanced Renamer. You can write the list in any raw text editor, save it and load it in the application.
Thumbnail mode
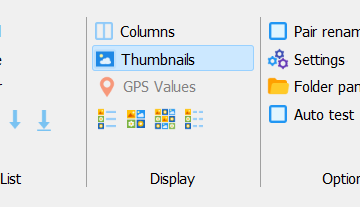 To enter and exit thumbnail mode, use the button Thumbnail on the toolbar. Thumbnail mode is intended for sorting and renaming image
files by displaying the actual image instead of the small icon in the list.
To enter and exit thumbnail mode, use the button Thumbnail on the toolbar. Thumbnail mode is intended for sorting and renaming image
files by displaying the actual image instead of the small icon in the list.
You can use the settings dialog to specify the size of your thumbnails.
Next to the Thumbnails button there is a View Style selection button. The button can be used to change how the files will be displayed in the list.
Some views are more suited for sorting image files than others but displays less details.
Be aware that extracting thumbnails from all the files in the list may take some time and stress your computer hardware.
Using too big a list in thumbnail mode can make Advanced Renamer and your computer slow.
Program
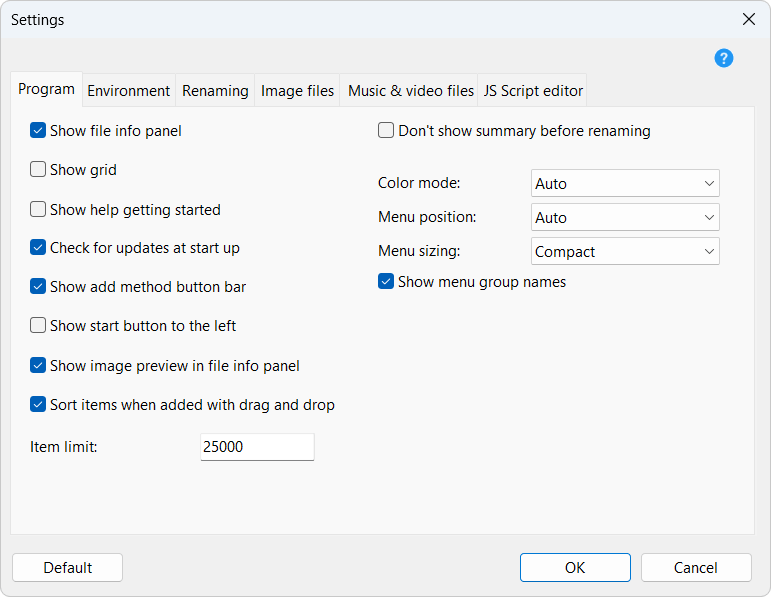
If checked, the FileInfo Box in the bottom of Advanced Renamer main window is shown.
Default: On
Toggles the file and folder list grid lines.
Default: Off
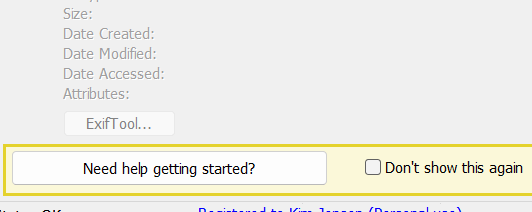
Will display a button in the grid for fast access to the quick help when there is no files in the list.
Default: On
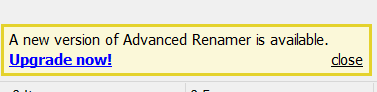
Let Advanced Renamer automatically check for updates every time the program starts. A link to the download site will be displayed in the bottom of the main window when there is an update.
Default: On
Determines if the button bar for quick access to adding methods should be visible.
Default: On
Some like the "Start batch" button to left other to the right. Choose your preferred position.
Default: Off
Choose if the program shall sort files when they are added with drag and drop (option on). If off, the program will add the files in the order they are selected at the source.
Default: On
The maximum number of files or folders the program can hold in the list. Increase this if necessary. Cannot be set to a lower number thasn 25000. Note, can make the program slow if set to high
If you get the error message "Cannot add files. You cannot load more than 25000 items into the list" when adding files, you might want to increase this value.
Default: 25000
If checked, the program will not display a confirmation window before the batch is started with the Start Batch button. Instead it will just start the batch without any warnings or confirmations.
Default: Off
Choose between dark og light visual program user interface. When set to Auto, the program will choose the mode selected in Windows settings.
Default: Auto
Set where the main program toolbar should be positioned. Choose "Top of window" to have the menu at the very top of the window spanning the entire width of the screen. Option "Top of list" will place the menu just above the list, but to the right of the method panel. When set top Auto, the program will set the menu at the top of the list, unless the window is too narrow, i which case it will automatically move it to the top of the window.
Default: Auto
| Super compact: | Only displays a thin menu bar with dropdown menus representing each button group. This is the most space saving layout. |
| Compact: | Displays the program menu in the default state, with only a small amount of spacing between each menu item. |
| Normal: | The same as Compact but with more spacing between menu items. |

Compact:
Determines if the names of the button groups should be visible when the Menu sizing is set to Compact or Normal. Turn this option off to save vertical space in the menu leaving more room for items in the list.
Default: On
Environment

Explorer Context Menu
When turned on you will be able to add files and folders in Windows Explorer by just right clicking the items.
Default: Off
Associate .aren files with Advanced Renamer
Files named .aren containing renaming presets can be opened with Advanced Renamer. If checked these files will when executed load the presets from the file.
Default: On
Save settings folder
Those where to save your personal settings. Normally the files are located in an application folder in the user account folder. If you prefer you can store the files where aren.exe (the Advanced Renamer executable) is located. This is the setting used when using the program in a portable configuration.
Default: When using the installer: Personal folder, when using the portable version: Same folder as aren.exe
Renaming

Replace Unsupported With
Determines what unsupported chars in ID3/MP3 Tags should be replaced with. ID3 Tags often includes chars that are invalid for filenames eg. : or /.
Default: _
Word separators
Some features work on the words of a filename. The New Case method can change case of the first letter of every word, and the Word tag can be used to insert a word from the filename in an other location of the filename. Use this text field to change which characters are used to separate the words.
Default: . ,_-()[]{}!
Add files when batch ends
Setup what Advanced Renamer should do when a batch is done. When set to Ask, a window with four choices will be shown after the batch is done.
Default: Ask
Use zero padding in Inc Nr tags
When turned on the numbers produced by Inc Nr and Inc NrDir will have leading zeros. The number of leading zeroes will depend on the number of items in the list or the number of files in the folder depending the tag in use.
Default: On
Checked state affects Inc Nr tags
If checked the Inc Nr tag will only increment for items in the list where the checkbox is checked.
Default: Off
Image files

Thumbnail width & heigh
This specifies the dimension of the thumbnails when Advanced Renamer is in thumbnail mode. The thumbnail mode works with any file, but is only really useful when sorting and renaming pictures.
Default: Width: 120 Height: 120
EXIF-field for image date time operations
Image files can have up to three different timestamps stored in the Exif informations. Use this option to choose which value you want Advanced Renamer should use when reading file information.
Default: Date taken
Use EXIF information for image width and height
If turned on, the program will look for image width and height in the EXIF part of the image file. If no EXIF information is found, Advanced Renamer will open the image to determine the dimensions of the image. If this feature is turned off the program will always open the image file to find the width and height which is slower than using EXIF. EXIF is primarily used on JPEG images taken with a digital camera.
Default: On
Music & video files

ID3 Sequence
Choose in which order Advanced Renamer should look for ID3 tags in music files.
Default: ID3v2, ID3v1
Don't analyze music metadata
Set this to skip metadata analysis og music files. Can be used to speed up adding files.
Default: Off
Don't analyze video metadata
Set this to skip metadata analysis og vidoe files. Can be used to speed up adding files.
Default: Off
JS Script editor

These settings apply to all editor windows using JavaScript.
Tab indent size
Any tab indents are converted to spaces. Change this value to the amount of spaces you prefer.
Default: 2
Scroll past end of line
Allow the text cursor to move last the last character of a line in the editor.
Default: On
Files from CSV import
With the CSV import window you can import both files and new file names into Advanced Renamer.
Filename
The csv file can either be a file previously saved by Advanced Renamer or created in a program like Microsoft Excel or LibreOffice.
Base folder
If the csv file doesn't contain absolute paths to original files, you can use this control to define a common base path for the files.
Column separator
The separator used to separate the individual columns in the csv file. This is usually ; or ,.
First line is header
If the first line in the csv file is a header line describing the column names you should check this to ignore this line.
Column for original filename / Column for new filename
The column index of the original file names and the new filenames.

Data from CSV import
Advanced Renamer will automatically import embedded metadata from files added to the list. If you have metadata not embedded directly in the files you can instead import the metadata from a CSV file. To do so, click Import -> Data from CSV. A window from which to choose a CSV file will appear.
After import the tag <Csv:X> can add the value of the column represented by X to the filename. X is a numeric value starting from 1 representing the index of the column to use. The first column can be used by using this tag <Csv:1>.
Filename>
The location of the CSV file to import. The file can be created using Microsoft Office, Libreoffice, or another spreadsheet
tool.
Column separator
The separator used to separate the individual columns in the csv file. This is usually ; or ,.
First line is header
If the first line in the csv file is a header line describing the column names you should check this to ignore this line.
File encoding
If your file doesn't load well or the characters look wrong, maybe loaded with a different alphabet, your file encoding
might not match the encoding used for import. Use this drop-down box to choose an alternate encoding if needed.
